# How to Plumb
**Measure a building with your phone.**
📱 **The app: ** — opens in your browser, nothing to install.
---
## The idea in one picture
A photo can't tell anyone how wide that window is.
A photo **with a ruler of known size in it** can. That's the whole trick — everything below is just
doing it carefully enough that the number is trustworthy.
So the job has two halves:
| Half | Where | Takes |
|---|---|---|
| **Make the ruler** — print a card and measure it | at home, once | 10 minutes |
| **Use it** — photograph a wall with the card in shot | at the building, every time | 5 minutes |
---
## Contents
**Part 1 — At home (do this once)**
1. [Print the card](#step-1--print-the-card)
2. [Check the print came out right](#step-2--check-the-print-came-out-right)
3. [Measure the card](#step-3--measure-the-card) ← the step that matters most
**Part 2 — At the building (every time)**
4. [Put the card on the wall](#step-4--put-the-card-on-the-wall)
5. [Stand square on](#step-5--stand-square-on)
6. [Take the photos](#step-6--take-the-photos)
7. [Calibrate](#step-7--calibrate)
8. [Check your work](#step-8--check-your-work)
9. [Measure, save, upload](#step-9--measure-save-upload)
**Reference**
- [The one big trap](#the-one-big-trap)
- [Common mistakes](#common-mistakes)
- [Print this: field card](#print-this-field-card)
- [Glossary](#glossary)
---
## What you need
| | | Cost |
|---|---|---|
| 📱 **A phone** | Android + Chrome is best. iPhone works with fewer features — the app tells you which you've got | — |
| 🖨️ **A printed card** | [A4](docs/assets/target-a4.svg) · [US Letter](docs/assets/target-letter.svg) | ~$1 |
| 📏 **A steel rule** | To measure the card. *Not* a tape measure — [why](#why-a-steel-rule-and-not-a-tape) | ~$10 |
| 📋 **Stiff card or foam board** | To glue the printed card to, so it can't bend | ~$5 |
| 📐 *Optional:* a tape measure | For the [check](#step-8--check-your-work) at the building | — |
---
---
# Part 1 — At home
Do this once. The result is a "ruler" you'll reuse at every building.
## Step 1 · Print the card
Download and print **one** of these:
| Paper | Download |
|---|---|
| **A4** — most of the world | **[target-a4.svg](docs/assets/target-a4.svg)** |
| **US Letter** — US, Canada | **[target-letter.svg](docs/assets/target-letter.svg)** |
Both have the same target on them, so it makes no difference which you use.
**In the print dialog:**
- ✅ Scale: **100%** or **"Actual size"**
- ❌ Turn **off** "Fit to page" / "Shrink to fit" / "Scale to fit media"
- Plain white paper. **Matte, not glossy** — glossy reflects and hides the corners.
### This is exactly what comes out
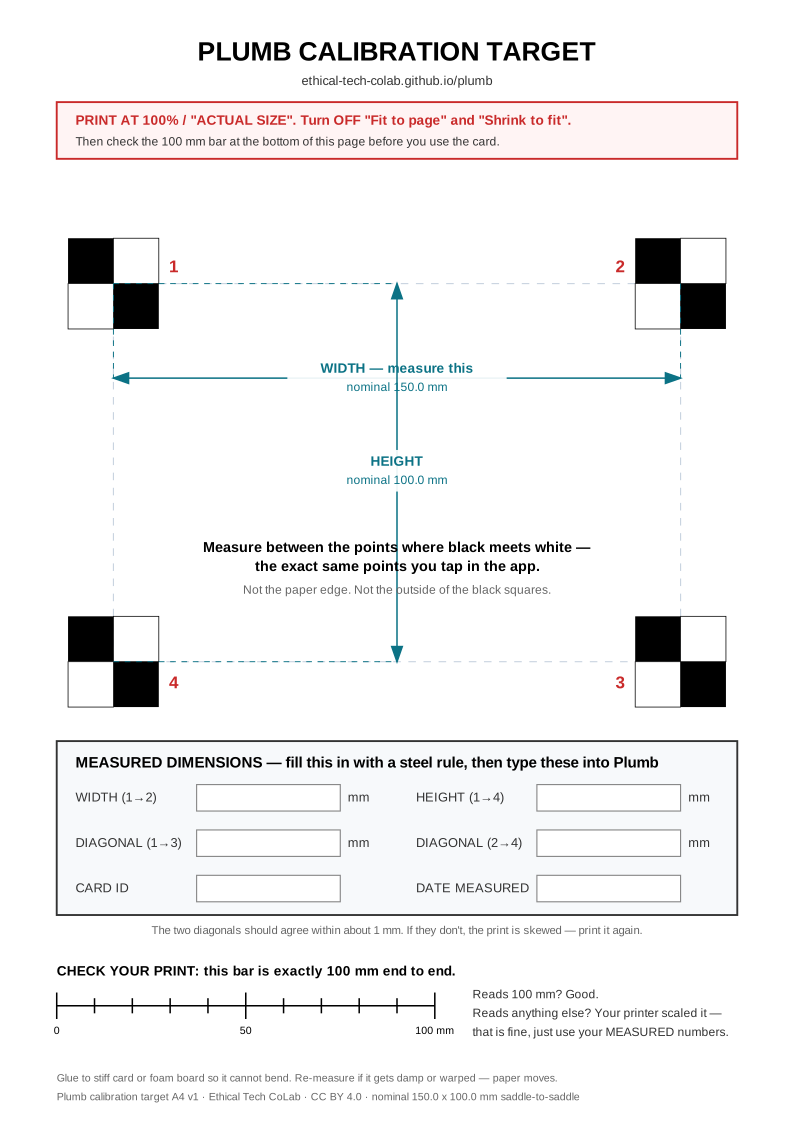 Everything you need is printed on the card itself — the dimensions to measure, boxes to write them
in, and a bar to check your printer. **You don't need to remember any of this in the field.**
The four corners are **checkerboards**. Where the black and white squares touch is called a *saddle
point*, and it's the reason the card looks like this: it's the most precisely locatable mark you can
print. You can see it exactly by eye, and later the software can find it to a fraction of a pixel.
> 🎯 **That meeting point is the whole game.** It's what you measure between, and it's what you tap
> in the app. Same point, both times.
---
## Step 2 · Check the print came out right
Find the **100 mm bar** near the bottom of the card. Put your steel rule on it.
| It reads | Meaning | Do |
|---|---|---|
| **100 mm** | Printer is accurate | Carry on |
| **97 mm**, or anything else | Printer scaled the page | **Carry on anyway** — you're about to measure the real card |
Either way you're fine, because you never tell the app the *nominal* size — you tell it what you
actually measured. That's the entire reason this step exists.
> **Why this matters so much:** printers routinely scale by 1–3% from margins and driver defaults.
> If you typed `150` but the card really printed at `145.5`, every measurement you ever took with it
> would be **3% wrong**. A 3 m wall would read 3.09 m. And nothing on screen would look wrong.
---
## Step 3 · Measure the card
**This is the most important step in the guide.** Get this right and everything downstream works.
### Measure between the points where black meets white

| ✅ Measure between these | ❌ Never these |
|---|---|
| The points where black touches white | The outer corners of the black squares |
| | The edge of the paper |
| | The dashed guide rectangle |
> Measuring to the paper edge instead of the pattern is out by about 12 mm on a 150 mm card — an
> **8% error** on everything you go on to measure.
### Take four measurements
Write them in the boxes printed on the card:
| Measure | From → to | Should be about |
|---|---|---|
| **Width** | ① → ② | 150 mm |
| **Height** | ① → ④ | 100 mm |
| **Diagonal** | ① → ③ | 180 mm |
| **Diagonal** | ② → ④ | 180 mm |
**Only width and height go into the app.** The two diagonals are a squareness check: if they differ
by more than about 1 mm, the print came out skewed — print it again.
### Why a steel rule and not a tape
A tape measure has a **sliding hook** on the end (deliberately — it slides by exactly the thickness
of the hook) and it **sags** across a span. Both cost you a millimetre or two. A steel rule has
neither problem.
- Lay the rule flat on the card and look **straight down** — reading at an angle adds parallax error
- Read to the nearest **0.5 mm**; that's ~0.3% on a 150 mm card, comfortably good enough
- Measure twice. If the readings disagree, measure a third time
### Finish the card
- **Glue it to stiff card or foam board.** A card that bows in the middle throws its own corners out
of plane, which quietly corrupts everything.
- **Write the measured numbers on the back**, with the date.
- **Re-measure if it gets damp or warped.** Paper genuinely moves with humidity.
- Making several? Give each an **ID** so you know which numbers belong to which card.
### No printer?
You don't strictly need one. Anything flat and rigid whose size you've measured will do — a window
opening, a door, a panel, ten brick courses divided by ten. Same rule: **measure between the exact
points you're going to tap.**
---
---
# Part 2 — At the building
> ### ⚠️ Safety first, every time
> - Stay on public pavement unless you have permission to be on private property
> - **Never** step into a road, bike lane or rail corridor for a shot. Back up instead
> - Look up often — you're walking while staring at a screen
> - Don't block doorways, ramps or pedestrian flow
> - If someone asks you to stop, stop
> - **No photograph is worth an injury or a citation**
## Step 4 · Put the card on the wall
First decide **which flat surface** you're measuring — say, the brick face of the front wall. Plumb
measures one flat surface at a time. Type a note in the app: *"north facade, brick, ground floor"*.
Then put the card **flat against that same surface**, near the middle of the area you care about.

| ✅ | ❌ |
|---|---|
| Taped flat against the brick | Held in your hand |
| Propped square against the wall | Tilted at an angle |
| On the surface you're measuring | On a cornice, sill or anything that sticks out |
**Good walls to start with:** flat brick or stone, a plain facade, a shopfront, a door.
**Leave until later:** heavily carved surfaces, deep porches, anything with lots of projections.
---
## Step 5 · Stand square on

Stand **roughly in front** of the wall, camera pointing at it. You do not need to be perfect — Plumb
corrects perspective mathematically, so being a few degrees off costs you almost nothing.
### Watch the bubble, not the numbers
Tap **Enable sensors** and a **bubble level** appears in the middle of the screen — the same idea as
the bubble on a tripod head. Get the bubble inside the ring. That's it.
- 🟢 **Bubble in the ring** → good, take the shot
- 🟠 **Bubble outside** → the app tells you which way to tip the phone, in words
- 📳 **A short buzz** means you've arrived — you can keep your eyes on the building
There are numbers in the corner too, but they're for the record. **You should never need to read them.**
### How square is square enough?
More relaxed than you'd think, because a homography corrects any perspective *exactly*. Tilt doesn't
bias your measurement — it only costs a little precision, by squashing the target:
| Off by | Target shrinks to | Precision cost | Verdict |
|---|---|---|---|
| 5° | 99.6% | ×1.00 | perfect |
| 10° | 98.5% | ×1.02 | fine |
| 15° | 96.6% | ×1.04 | fine |
| 20° | 94.0% | ×1.06 | acceptable |
| 30° | 86.6% | ×1.15 | getting sloppy |
| 45° | 70.7% | ×1.41 | re-shoot |
> An earlier version of this app demanded 3°, which is very hard to hold by hand. That turned out to
> be buying about **0.017 mm** of extra precision — against a typical operator tap error of **1–3 mm**.
> It was a hundred times stricter than it needed to be. Roughly upright is genuinely fine.
**Sideways tilt (roll) doesn't matter at all** for measurement — it just rotates the picture. Keep it
level for a tidy archival photo, but it will never block you.
### Holding the phone still
Movement at the moment of the shutter ruins more captures than tilt ever does.
- **Brace against something** — a railing, a lamppost, a wall, your own chest
- **Tuck your elbows in** against your ribs
- **Breathe out, then shoot** — don't hold your breath
- A **tripod** is ideal if you have one and the site permits it (some landmark sites restrict them).
A tabletop or clamp tripod on a railing works well. **You do not need one** — this is designed to
work handheld
- Use **auto-capture** (below) rather than tapping the screen, which nudges the phone
### Let the phone take the shot
Tick **Auto-capture when level and steady** in the settings sheet. Brace the phone, aim, and wait — it
fires by itself once it's settled, then **switches itself off**.
This removes the hardest part of handheld capture: holding still *and* pressing a button at the same
time. If you'd rather shoot manually, the **shutter button** is always on screen.
### The controls stay put
On a phone the viewfinder fills the screen and the controls you use most sit in a **tray fixed along
the bottom edge**. The tray never scrolls and is never covered:
| Button | What it does |
|---|---|
| ▦ **Grid** | Cycles the on-screen grid: off → thirds → metric (once calibrated) |
| ◎ **Level** | Shows or hides the bubble level and its prompts |
| 🔘 **Shutter** | Takes the photograph |
| ↺ **Live** | Returns to the live view after reviewing a shot |
| ▤ **Setup** | Opens and closes the settings sheet |
Everything else lives in a **sheet that slides up from just above the tray**. Drag its handle, or tap
**Setup**, to cycle between a peek, half screen and full screen. The camera view never scrolls away,
and the shutter is always under your thumb.
### Photographing the ground?
Set **What are you photographing** to *"The ground or paving"* and the bubble re-centres for a
phone pointing down instead of upright.
---
## Step 6 · Take the photos
Plumb takes **two photos from the same spot**:
1. **With the card** in frame
2. **Clean** — same view, card removed
Why two? The official documentation standard (HABS) *requires* a photo with a scale in it. But you
also want a clean photograph for design work. So you get both.
### Two ways to shoot
| | How | When |
|---|---|---|
| 🔘 **The shutter button** | The big round button in the tray at the bottom. Always there, always works | The normal way |
| ⏱️ **Auto-capture** | Tick it in the sheet, brace the phone, wait. It fires when level and steady | When tapping the screen would shake the shot |
**Auto-capture fires once and then switches itself off.** That's deliberate — you have your
photograph, so the app stops. Tick it again for the next one. A countdown appears in the shutter
button so you can see it coming, and moving the phone cancels it.
Tapping the shutter always wins: it cancels any pending auto-capture and shoots immediately.
The **↺ Live** button in the tray returns you to the live view after reviewing a shot.
### Before you tap the button
- Tap **Lock focus + exposure** — keeps the camera steady between shots *(Android)*
- Keep **zoom at 1.0×** — zooming breaks the calibration
- Brace your elbows against your body, breathe out, then tap
- Use the shutter or auto-capture, **not** "Freeze preview frame" — that's a low-quality preview
grab, useful only for checking framing

---
## Step 7 · Calibrate
"Calibrating" just means telling Plumb how big things really are.

1. Type in the width and height **you measured in [Step 3](#step-3--measure-the-card)** — not 150 × 100
2. Tap **Pick 4 corners**
3. Tap the four **saddle points** — where black meets white — clockwise from top-left:
① → ② → ③ → ④
4. Tap **Solve calibration**
**Zoom in before each tap.** A few pixels of sloppiness here becomes millimetres of error later.
You'll see a badge appear: **CAL-3 · UNVERIFIED**. Plumb knows the scale but hasn't proved it's
right — that's the next step.
### Turn on the grid
Tap **▦ Grid** in the tray to cycle the overlay, or pick **Metric grid** in the sheet. A real-world
grid appears — 100 mm squares, or 1 foot, your choice. The grid draws over the live view as well as
over a captured photo, so you can use it to frame the shot.
On an angled photo the grid will **look like it converges into the distance**. That's correct. It's
what a real grid does in perspective, and it's your visual proof that Plumb has understood the
geometry of the shot.
Cycle **Grid** back to off any time to see the clean photo. The grid is never baked into your
original image.
---
## Step 8 · Check your work
**Don't skip this.** It's what separates a measurement from a guess.

Measure something you **already know**, that you did **not** use to calibrate:
1. Pick something on the wall you can measure with a tape — a window width, a door, ten brick courses
2. Measure it by hand and write it down
3. In the app: enter that known length, tap **Pick check points**, tap the two ends
| Result | Meaning |
|---|---|
| ✅ **VERIFIED** | Within tolerance. Your measurements are trustworthy |
| ❌ **FAILED** | Something's wrong — Plumb **blocks measuring** until you fix it |
> **Why it has to be something different:** checking your calibration against the same card you
> calibrated with proves nothing — of course it agrees with itself. Only an *independent* length
> proves it works.
**If the check fails, work down this list:**
| Check | Fix |
|---|---|
| Did you type the *measured* card size? | Re-measure the card |
| Was the card flat on the wall? | Re-shoot with it flat |
| Did you tap the saddle points accurately? | Zoom in, redo the corners |
| Is your check length on the same flat surface? | Pick a different feature |
| Was your hand measurement right? | Re-measure it |
Two checks beat one — do a horizontal and a vertical.
---
## Step 9 · Measure, save, upload
### Measure
Tap **Measure distance**, then tap the two points. You get:
```
window head width 1220.4 ± 4.1 mm (95%)
tier CAL-3 · calibration VERIFIED · USIBD LOA30
```
| Part | Meaning |
|---|---|
| `1220.4 mm` | The measurement |
| `± 4.1 mm (95%)` | Honest error range — the truth is almost certainly within this |
| `CAL-3` | How it was calibrated |
| `VERIFIED` | Your check passed |
| `LOA30` | The professional accuracy grade it meets |
| `PROVISIONAL` | On-phone estimate; the server produces a better final number later |
> **Never write down the number without the ±.** A measurement without its uncertainty isn't a
> measurement, it's a claim. Plumb won't export one, and neither should you.
### Save
| File | What it is |
|---|---|
| **Raw image** | Your original photo, untouched — no grid drawn on it, not re-compressed |
| **Overlay** | The grid and measurements, as a separate layer |
| **Annotated derivative** | Photo + grid combined, for reports |
| **Provenance sidecar** | Where, when, with what, by whom — and what it does *not* prove |
The original is **never** modified. Everything else can be regenerated; the original can't.
### Upload — Wi-Fi only by default 📶
Full-resolution photos are big. A day's work can be several gigabytes, so **Plumb won't upload over
cellular unless you tell it to.**
| Setting | Behaviour |
|---|---|
| **Wi-Fi only** *(default)* | Nothing goes over cellular. Ever |
| **Wi-Fi preferred** | Uses fast cellular if there's no Wi-Fi |
| **Any network** | Uploads on anything — watch your data plan |
| **Manual only** | Nothing uploads until you tap the button |
**Nothing is lost while it waits.** Captures sit safely in a queue on the phone and upload the moment
you're on Wi-Fi. If your phone's Data Saver is on, Plumb holds uploads regardless.
> ⚠️ **Before you finish for the day:** get on Wi-Fi and let the queue drain, or export a local copy.
> Phone browsers can clear storage when space runs low.
---
---
# Reference
## The one big trap

**Plumb is only exact on the surface you calibrated.**
Calibrate on the brick wall, then measure a cornice sticking out 600 mm, and your answer will be
wrong — while looking completely fine. From 15 m away that cornice can read about **24 mm out**,
which is bigger than the entire error budget.
**What to do:**
1. **Just measure things on the wall** — simplest and safest
2. **Tell Plumb the depth** — type it into "Depth off plane" and the error range widens honestly
3. **Calibrate a second plane** on the cornice itself
4. **Shoot a full overlapping set** and let the server build a 3D model
If you remember one thing from this guide, make it this one.
---
## Common mistakes
| Mistake | What happens | Fix |
|---|---|---|
| Printing with "fit to page" | Card is 1–3% wrong, so everything is | Print at 100%, check the 100 mm bar |
| Typing the nominal 150 × 100 | Wrong by however much the printer scaled | Type your **measured** numbers |
| Measuring to the paper edge | ~8% error | Measure where black meets white |
| Card held in hand, or tilted | Bad calibration | Tape it flat to the wall |
| Card bent or bowed | Corners fall out of plane | Glue it to stiff board |
| **Moving as you tap the shutter** | **Blur — the commonest ruined capture** | **Brace, and use auto-capture** |
| Chasing perfect level | Wastes time for ~0.02 mm | Bubble in the ring is enough |
| Skipping the check | You never find out it's wrong | Always do a hold-out check |
| Checking against your own card | Proves nothing | Use a *different* known length |
| Measuring things that stick out | Silently wrong | See [the one big trap](#the-one-big-trap) |
| Using zoom | Breaks calibration | Keep zoom 1.0×, walk closer |
| Card tiny in the frame | Large errors | Get closer, or print bigger |
| Card at the frame edge | Lens distortion | Keep it near the centre |
| Shooting into sun / deep shadow | Corners can't be found | Even light. Overcast is ideal |
| Writing a number without its ± | Not a measurement any more | Always carry the uncertainty |
---
## Print this: field card
```
┌─────────────────────────────────────────────────────┐
│ PLUMB — FIELD CARD │
├─────────────────────────────────────────────────────┤
│ AT HOME (once) │
│ □ Printed at 100%, NOT "fit to page" │
│ □ 100 mm bar checks out with a steel rule │
│ □ Width + height measured where black meets white │
│ (NOT the paper edge) │
│ □ Diagonals agree within ~1 mm │
│ □ Numbers on the back; card glued to stiff board │
│ │
│ AT THE WALL │
│ □ Safe spot, on the pavement │
│ □ Card FLAT on the wall you're measuring │
│ □ Bubble inside the ring — roughly upright is fine│
│ □ Brace against something; use auto-capture │
│ □ Zoom 1.0×; lock focus + exposure │
│ □ Full-res photo — with card, then clean │
│ │
│ IN THE APP │
│ □ Type MEASURED size, not 150 × 100 │
│ □ Tap saddles ①TL ②TR ③BR ④BL — zoom in first │
│ □ Solve calibration │
│ □ HOLD-OUT CHECK ⇒ must read VERIFIED │
│ □ Measure. Keep the ± with every number │
│ │
│ BEFORE YOU LEAVE │
│ □ Queue uploaded, or exported locally │
│ │
│ REMEMBER: accurate only ON the calibrated surface │
└─────────────────────────────────────────────────────┘
```
---
## Glossary
| Term | Plain English |
|---|---|
| **Saddle point** | Where the black and white squares touch. The most precisely locatable mark you can print — what you measure between, and what you tap |
| **Calibration** | Telling Plumb how big things really are, using something of known size |
| **Nominal vs measured** | *Nominal* = the size the card was designed to be (150 × 100). *Measured* = what your printer actually produced. Always use measured |
| **Hold-out check** | Measuring something you already know, to prove the calibration works |
| **Plane** | The flat surface you're measuring — usually a wall face |
| **Off-plane** | Anything sticking out from that surface. Measured less accurately |
| **CAL-0 … CAL-5** | How good the calibration is. CAL-0 = no measuring allowed. CAL-3 = normal good practice |
| **± 4.1 mm (95%)** | The honest error range — 95% confident the truth is inside it |
| **LOA** | Professional accuracy grade (USIBD). LOA30 ≈ 6 mm, LOA20 ≈ 15 mm |
| **PROVISIONAL** | The quick on-phone answer. The server produces the final, better one |
| **Provenance** | The record of where, when, how and by whom a photo was taken |
| **Orthophoto** | A photo mathematically flattened so it works like a scale drawing |
| **HABS** | The US national standard for recording historic buildings |
---
## What next
- How it works underneath → [docs/02-calibration-methodology.md](docs/02-calibration-methodology.md)
- Contributing captures → [CONTRIBUTING.md](CONTRIBUTING.md)
- Video walkthroughs → [docs/video-plan.md](docs/video-plan.md)
**Something here unclear?** [Open an issue](https://github.com/Ethical-Tech-CoLab/plumb/issues). If a
beginner got confused, the guide is wrong — not the beginner.
Everything you need is printed on the card itself — the dimensions to measure, boxes to write them
in, and a bar to check your printer. **You don't need to remember any of this in the field.**
The four corners are **checkerboards**. Where the black and white squares touch is called a *saddle
point*, and it's the reason the card looks like this: it's the most precisely locatable mark you can
print. You can see it exactly by eye, and later the software can find it to a fraction of a pixel.
> 🎯 **That meeting point is the whole game.** It's what you measure between, and it's what you tap
> in the app. Same point, both times.
---
## Step 2 · Check the print came out right
Find the **100 mm bar** near the bottom of the card. Put your steel rule on it.
| It reads | Meaning | Do |
|---|---|---|
| **100 mm** | Printer is accurate | Carry on |
| **97 mm**, or anything else | Printer scaled the page | **Carry on anyway** — you're about to measure the real card |
Either way you're fine, because you never tell the app the *nominal* size — you tell it what you
actually measured. That's the entire reason this step exists.
> **Why this matters so much:** printers routinely scale by 1–3% from margins and driver defaults.
> If you typed `150` but the card really printed at `145.5`, every measurement you ever took with it
> would be **3% wrong**. A 3 m wall would read 3.09 m. And nothing on screen would look wrong.
---
## Step 3 · Measure the card
**This is the most important step in the guide.** Get this right and everything downstream works.
### Measure between the points where black meets white

| ✅ Measure between these | ❌ Never these |
|---|---|
| The points where black touches white | The outer corners of the black squares |
| | The edge of the paper |
| | The dashed guide rectangle |
> Measuring to the paper edge instead of the pattern is out by about 12 mm on a 150 mm card — an
> **8% error** on everything you go on to measure.
### Take four measurements
Write them in the boxes printed on the card:
| Measure | From → to | Should be about |
|---|---|---|
| **Width** | ① → ② | 150 mm |
| **Height** | ① → ④ | 100 mm |
| **Diagonal** | ① → ③ | 180 mm |
| **Diagonal** | ② → ④ | 180 mm |
**Only width and height go into the app.** The two diagonals are a squareness check: if they differ
by more than about 1 mm, the print came out skewed — print it again.
### Why a steel rule and not a tape
A tape measure has a **sliding hook** on the end (deliberately — it slides by exactly the thickness
of the hook) and it **sags** across a span. Both cost you a millimetre or two. A steel rule has
neither problem.
- Lay the rule flat on the card and look **straight down** — reading at an angle adds parallax error
- Read to the nearest **0.5 mm**; that's ~0.3% on a 150 mm card, comfortably good enough
- Measure twice. If the readings disagree, measure a third time
### Finish the card
- **Glue it to stiff card or foam board.** A card that bows in the middle throws its own corners out
of plane, which quietly corrupts everything.
- **Write the measured numbers on the back**, with the date.
- **Re-measure if it gets damp or warped.** Paper genuinely moves with humidity.
- Making several? Give each an **ID** so you know which numbers belong to which card.
### No printer?
You don't strictly need one. Anything flat and rigid whose size you've measured will do — a window
opening, a door, a panel, ten brick courses divided by ten. Same rule: **measure between the exact
points you're going to tap.**
---
---
# Part 2 — At the building
> ### ⚠️ Safety first, every time
> - Stay on public pavement unless you have permission to be on private property
> - **Never** step into a road, bike lane or rail corridor for a shot. Back up instead
> - Look up often — you're walking while staring at a screen
> - Don't block doorways, ramps or pedestrian flow
> - If someone asks you to stop, stop
> - **No photograph is worth an injury or a citation**
## Step 4 · Put the card on the wall
First decide **which flat surface** you're measuring — say, the brick face of the front wall. Plumb
measures one flat surface at a time. Type a note in the app: *"north facade, brick, ground floor"*.
Then put the card **flat against that same surface**, near the middle of the area you care about.

| ✅ | ❌ |
|---|---|
| Taped flat against the brick | Held in your hand |
| Propped square against the wall | Tilted at an angle |
| On the surface you're measuring | On a cornice, sill or anything that sticks out |
**Good walls to start with:** flat brick or stone, a plain facade, a shopfront, a door.
**Leave until later:** heavily carved surfaces, deep porches, anything with lots of projections.
---
## Step 5 · Stand square on

Stand **roughly in front** of the wall, camera pointing at it. You do not need to be perfect — Plumb
corrects perspective mathematically, so being a few degrees off costs you almost nothing.
### Watch the bubble, not the numbers
Tap **Enable sensors** and a **bubble level** appears in the middle of the screen — the same idea as
the bubble on a tripod head. Get the bubble inside the ring. That's it.
- 🟢 **Bubble in the ring** → good, take the shot
- 🟠 **Bubble outside** → the app tells you which way to tip the phone, in words
- 📳 **A short buzz** means you've arrived — you can keep your eyes on the building
There are numbers in the corner too, but they're for the record. **You should never need to read them.**
### How square is square enough?
More relaxed than you'd think, because a homography corrects any perspective *exactly*. Tilt doesn't
bias your measurement — it only costs a little precision, by squashing the target:
| Off by | Target shrinks to | Precision cost | Verdict |
|---|---|---|---|
| 5° | 99.6% | ×1.00 | perfect |
| 10° | 98.5% | ×1.02 | fine |
| 15° | 96.6% | ×1.04 | fine |
| 20° | 94.0% | ×1.06 | acceptable |
| 30° | 86.6% | ×1.15 | getting sloppy |
| 45° | 70.7% | ×1.41 | re-shoot |
> An earlier version of this app demanded 3°, which is very hard to hold by hand. That turned out to
> be buying about **0.017 mm** of extra precision — against a typical operator tap error of **1–3 mm**.
> It was a hundred times stricter than it needed to be. Roughly upright is genuinely fine.
**Sideways tilt (roll) doesn't matter at all** for measurement — it just rotates the picture. Keep it
level for a tidy archival photo, but it will never block you.
### Holding the phone still
Movement at the moment of the shutter ruins more captures than tilt ever does.
- **Brace against something** — a railing, a lamppost, a wall, your own chest
- **Tuck your elbows in** against your ribs
- **Breathe out, then shoot** — don't hold your breath
- A **tripod** is ideal if you have one and the site permits it (some landmark sites restrict them).
A tabletop or clamp tripod on a railing works well. **You do not need one** — this is designed to
work handheld
- Use **auto-capture** (below) rather than tapping the screen, which nudges the phone
### Let the phone take the shot
Tick **Auto-capture when level and steady** in the settings sheet. Brace the phone, aim, and wait — it
fires by itself once it's settled, then **switches itself off**.
This removes the hardest part of handheld capture: holding still *and* pressing a button at the same
time. If you'd rather shoot manually, the **shutter button** is always on screen.
### The controls stay put
On a phone the viewfinder fills the screen and the controls you use most sit in a **tray fixed along
the bottom edge**. The tray never scrolls and is never covered:
| Button | What it does |
|---|---|
| ▦ **Grid** | Cycles the on-screen grid: off → thirds → metric (once calibrated) |
| ◎ **Level** | Shows or hides the bubble level and its prompts |
| 🔘 **Shutter** | Takes the photograph |
| ↺ **Live** | Returns to the live view after reviewing a shot |
| ▤ **Setup** | Opens and closes the settings sheet |
Everything else lives in a **sheet that slides up from just above the tray**. Drag its handle, or tap
**Setup**, to cycle between a peek, half screen and full screen. The camera view never scrolls away,
and the shutter is always under your thumb.
### Photographing the ground?
Set **What are you photographing** to *"The ground or paving"* and the bubble re-centres for a
phone pointing down instead of upright.
---
## Step 6 · Take the photos
Plumb takes **two photos from the same spot**:
1. **With the card** in frame
2. **Clean** — same view, card removed
Why two? The official documentation standard (HABS) *requires* a photo with a scale in it. But you
also want a clean photograph for design work. So you get both.
### Two ways to shoot
| | How | When |
|---|---|---|
| 🔘 **The shutter button** | The big round button in the tray at the bottom. Always there, always works | The normal way |
| ⏱️ **Auto-capture** | Tick it in the sheet, brace the phone, wait. It fires when level and steady | When tapping the screen would shake the shot |
**Auto-capture fires once and then switches itself off.** That's deliberate — you have your
photograph, so the app stops. Tick it again for the next one. A countdown appears in the shutter
button so you can see it coming, and moving the phone cancels it.
Tapping the shutter always wins: it cancels any pending auto-capture and shoots immediately.
The **↺ Live** button in the tray returns you to the live view after reviewing a shot.
### Before you tap the button
- Tap **Lock focus + exposure** — keeps the camera steady between shots *(Android)*
- Keep **zoom at 1.0×** — zooming breaks the calibration
- Brace your elbows against your body, breathe out, then tap
- Use the shutter or auto-capture, **not** "Freeze preview frame" — that's a low-quality preview
grab, useful only for checking framing

---
## Step 7 · Calibrate
"Calibrating" just means telling Plumb how big things really are.

1. Type in the width and height **you measured in [Step 3](#step-3--measure-the-card)** — not 150 × 100
2. Tap **Pick 4 corners**
3. Tap the four **saddle points** — where black meets white — clockwise from top-left:
① → ② → ③ → ④
4. Tap **Solve calibration**
**Zoom in before each tap.** A few pixels of sloppiness here becomes millimetres of error later.
You'll see a badge appear: **CAL-3 · UNVERIFIED**. Plumb knows the scale but hasn't proved it's
right — that's the next step.
### Turn on the grid
Tap **▦ Grid** in the tray to cycle the overlay, or pick **Metric grid** in the sheet. A real-world
grid appears — 100 mm squares, or 1 foot, your choice. The grid draws over the live view as well as
over a captured photo, so you can use it to frame the shot.
On an angled photo the grid will **look like it converges into the distance**. That's correct. It's
what a real grid does in perspective, and it's your visual proof that Plumb has understood the
geometry of the shot.
Cycle **Grid** back to off any time to see the clean photo. The grid is never baked into your
original image.
---
## Step 8 · Check your work
**Don't skip this.** It's what separates a measurement from a guess.

Measure something you **already know**, that you did **not** use to calibrate:
1. Pick something on the wall you can measure with a tape — a window width, a door, ten brick courses
2. Measure it by hand and write it down
3. In the app: enter that known length, tap **Pick check points**, tap the two ends
| Result | Meaning |
|---|---|
| ✅ **VERIFIED** | Within tolerance. Your measurements are trustworthy |
| ❌ **FAILED** | Something's wrong — Plumb **blocks measuring** until you fix it |
> **Why it has to be something different:** checking your calibration against the same card you
> calibrated with proves nothing — of course it agrees with itself. Only an *independent* length
> proves it works.
**If the check fails, work down this list:**
| Check | Fix |
|---|---|
| Did you type the *measured* card size? | Re-measure the card |
| Was the card flat on the wall? | Re-shoot with it flat |
| Did you tap the saddle points accurately? | Zoom in, redo the corners |
| Is your check length on the same flat surface? | Pick a different feature |
| Was your hand measurement right? | Re-measure it |
Two checks beat one — do a horizontal and a vertical.
---
## Step 9 · Measure, save, upload
### Measure
Tap **Measure distance**, then tap the two points. You get:
```
window head width 1220.4 ± 4.1 mm (95%)
tier CAL-3 · calibration VERIFIED · USIBD LOA30
```
| Part | Meaning |
|---|---|
| `1220.4 mm` | The measurement |
| `± 4.1 mm (95%)` | Honest error range — the truth is almost certainly within this |
| `CAL-3` | How it was calibrated |
| `VERIFIED` | Your check passed |
| `LOA30` | The professional accuracy grade it meets |
| `PROVISIONAL` | On-phone estimate; the server produces a better final number later |
> **Never write down the number without the ±.** A measurement without its uncertainty isn't a
> measurement, it's a claim. Plumb won't export one, and neither should you.
### Save
| File | What it is |
|---|---|
| **Raw image** | Your original photo, untouched — no grid drawn on it, not re-compressed |
| **Overlay** | The grid and measurements, as a separate layer |
| **Annotated derivative** | Photo + grid combined, for reports |
| **Provenance sidecar** | Where, when, with what, by whom — and what it does *not* prove |
The original is **never** modified. Everything else can be regenerated; the original can't.
### Upload — Wi-Fi only by default 📶
Full-resolution photos are big. A day's work can be several gigabytes, so **Plumb won't upload over
cellular unless you tell it to.**
| Setting | Behaviour |
|---|---|
| **Wi-Fi only** *(default)* | Nothing goes over cellular. Ever |
| **Wi-Fi preferred** | Uses fast cellular if there's no Wi-Fi |
| **Any network** | Uploads on anything — watch your data plan |
| **Manual only** | Nothing uploads until you tap the button |
**Nothing is lost while it waits.** Captures sit safely in a queue on the phone and upload the moment
you're on Wi-Fi. If your phone's Data Saver is on, Plumb holds uploads regardless.
> ⚠️ **Before you finish for the day:** get on Wi-Fi and let the queue drain, or export a local copy.
> Phone browsers can clear storage when space runs low.
---
---
# Reference
## The one big trap

**Plumb is only exact on the surface you calibrated.**
Calibrate on the brick wall, then measure a cornice sticking out 600 mm, and your answer will be
wrong — while looking completely fine. From 15 m away that cornice can read about **24 mm out**,
which is bigger than the entire error budget.
**What to do:**
1. **Just measure things on the wall** — simplest and safest
2. **Tell Plumb the depth** — type it into "Depth off plane" and the error range widens honestly
3. **Calibrate a second plane** on the cornice itself
4. **Shoot a full overlapping set** and let the server build a 3D model
If you remember one thing from this guide, make it this one.
---
## Common mistakes
| Mistake | What happens | Fix |
|---|---|---|
| Printing with "fit to page" | Card is 1–3% wrong, so everything is | Print at 100%, check the 100 mm bar |
| Typing the nominal 150 × 100 | Wrong by however much the printer scaled | Type your **measured** numbers |
| Measuring to the paper edge | ~8% error | Measure where black meets white |
| Card held in hand, or tilted | Bad calibration | Tape it flat to the wall |
| Card bent or bowed | Corners fall out of plane | Glue it to stiff board |
| **Moving as you tap the shutter** | **Blur — the commonest ruined capture** | **Brace, and use auto-capture** |
| Chasing perfect level | Wastes time for ~0.02 mm | Bubble in the ring is enough |
| Skipping the check | You never find out it's wrong | Always do a hold-out check |
| Checking against your own card | Proves nothing | Use a *different* known length |
| Measuring things that stick out | Silently wrong | See [the one big trap](#the-one-big-trap) |
| Using zoom | Breaks calibration | Keep zoom 1.0×, walk closer |
| Card tiny in the frame | Large errors | Get closer, or print bigger |
| Card at the frame edge | Lens distortion | Keep it near the centre |
| Shooting into sun / deep shadow | Corners can't be found | Even light. Overcast is ideal |
| Writing a number without its ± | Not a measurement any more | Always carry the uncertainty |
---
## Print this: field card
```
┌─────────────────────────────────────────────────────┐
│ PLUMB — FIELD CARD │
├─────────────────────────────────────────────────────┤
│ AT HOME (once) │
│ □ Printed at 100%, NOT "fit to page" │
│ □ 100 mm bar checks out with a steel rule │
│ □ Width + height measured where black meets white │
│ (NOT the paper edge) │
│ □ Diagonals agree within ~1 mm │
│ □ Numbers on the back; card glued to stiff board │
│ │
│ AT THE WALL │
│ □ Safe spot, on the pavement │
│ □ Card FLAT on the wall you're measuring │
│ □ Bubble inside the ring — roughly upright is fine│
│ □ Brace against something; use auto-capture │
│ □ Zoom 1.0×; lock focus + exposure │
│ □ Full-res photo — with card, then clean │
│ │
│ IN THE APP │
│ □ Type MEASURED size, not 150 × 100 │
│ □ Tap saddles ①TL ②TR ③BR ④BL — zoom in first │
│ □ Solve calibration │
│ □ HOLD-OUT CHECK ⇒ must read VERIFIED │
│ □ Measure. Keep the ± with every number │
│ │
│ BEFORE YOU LEAVE │
│ □ Queue uploaded, or exported locally │
│ │
│ REMEMBER: accurate only ON the calibrated surface │
└─────────────────────────────────────────────────────┘
```
---
## Glossary
| Term | Plain English |
|---|---|
| **Saddle point** | Where the black and white squares touch. The most precisely locatable mark you can print — what you measure between, and what you tap |
| **Calibration** | Telling Plumb how big things really are, using something of known size |
| **Nominal vs measured** | *Nominal* = the size the card was designed to be (150 × 100). *Measured* = what your printer actually produced. Always use measured |
| **Hold-out check** | Measuring something you already know, to prove the calibration works |
| **Plane** | The flat surface you're measuring — usually a wall face |
| **Off-plane** | Anything sticking out from that surface. Measured less accurately |
| **CAL-0 … CAL-5** | How good the calibration is. CAL-0 = no measuring allowed. CAL-3 = normal good practice |
| **± 4.1 mm (95%)** | The honest error range — 95% confident the truth is inside it |
| **LOA** | Professional accuracy grade (USIBD). LOA30 ≈ 6 mm, LOA20 ≈ 15 mm |
| **PROVISIONAL** | The quick on-phone answer. The server produces the final, better one |
| **Provenance** | The record of where, when, how and by whom a photo was taken |
| **Orthophoto** | A photo mathematically flattened so it works like a scale drawing |
| **HABS** | The US national standard for recording historic buildings |
---
## What next
- How it works underneath → [docs/02-calibration-methodology.md](docs/02-calibration-methodology.md)
- Contributing captures → [CONTRIBUTING.md](CONTRIBUTING.md)
- Video walkthroughs → [docs/video-plan.md](docs/video-plan.md)
**Something here unclear?** [Open an issue](https://github.com/Ethical-Tech-CoLab/plumb/issues). If a
beginner got confused, the guide is wrong — not the beginner.